
Our Fireplace Remodel
Last summer my husband and I decided it was time to replace our carpets with new flooring. While discussing the project, we knew we’d have to address the slate hearth that was in place. Since we were moving from carpet to laminate hardwood, we decided to remove the hearth altogether and redesign the fireplace in the process. I had always disliked the slate tile and thought our fireplace wall was, well… boring.
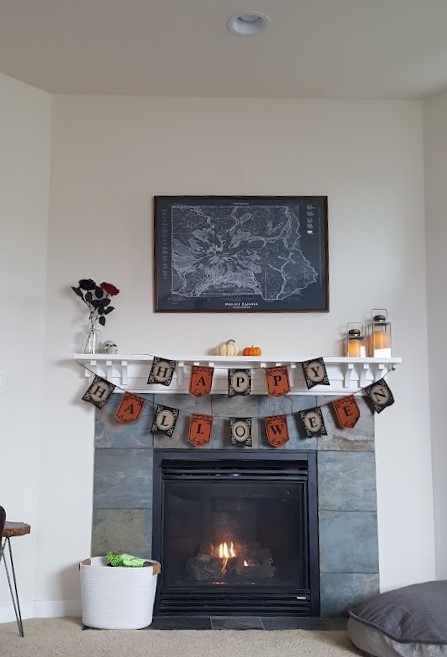
In starting to design the space, I took into consideration that the fireplace wall is angled, and it was a focal point of our living room. The current scale was all wrong. We briefly considered replacing the gas insert with a more modern, horizontal unit, but after pricing out options we decided to keep the current insert. Instead, we hired a fireplace servicer to come out and do a cleaning, re-paint the firebox, and add a fan kit.
The Design
Now that we knew we were keeping the current insert, I could design around it. Off to Pinterest I went to pull some inspiration. I knew I wanted to fill up the wall, and narrowed down a few options to achieve the look I was going for:
- Use large-scale porcelain tile and tile up the entire wall, filling the entire angled wall.
- Tile around the insert and fill up the rest of the wall space with shiplap.
Option number one was initially a strong contender because it would give us a clean, contemporary look. We were very close to going this route, as evidenced by us trying out our laminate sample with various options.


Ultimately, we were worried that the tile option might be more than we could realistically tackle ourselves and wouldn’t give us warm and cozy vibes. I also couldn’t get the shiplap idea out of my head.
The Shiplap Idea
Shiplap can be a tricky one. When I think of shiplap I instantly think of Joanna Gaines and modern farmhouse, which isn’t necessarily a bad thing, but I worried it might be too trendy. Too much shiplap can also start to feel shabby chic very quickly, which just wasn’t the style we were going for. We tend to lean toward modern contemporary and I didn’t want something that would seem out of place, so there was a fine line. BUT, shiplap can also look really sophisticated when it isn’t painted white.
Ultimately we nailed down our design to include: a white tile with texture for around the fireplace insert, a wood beam mantle, and shiplap… but in a dark, moody color.
The Inspiration:


Demoing the Fireplace
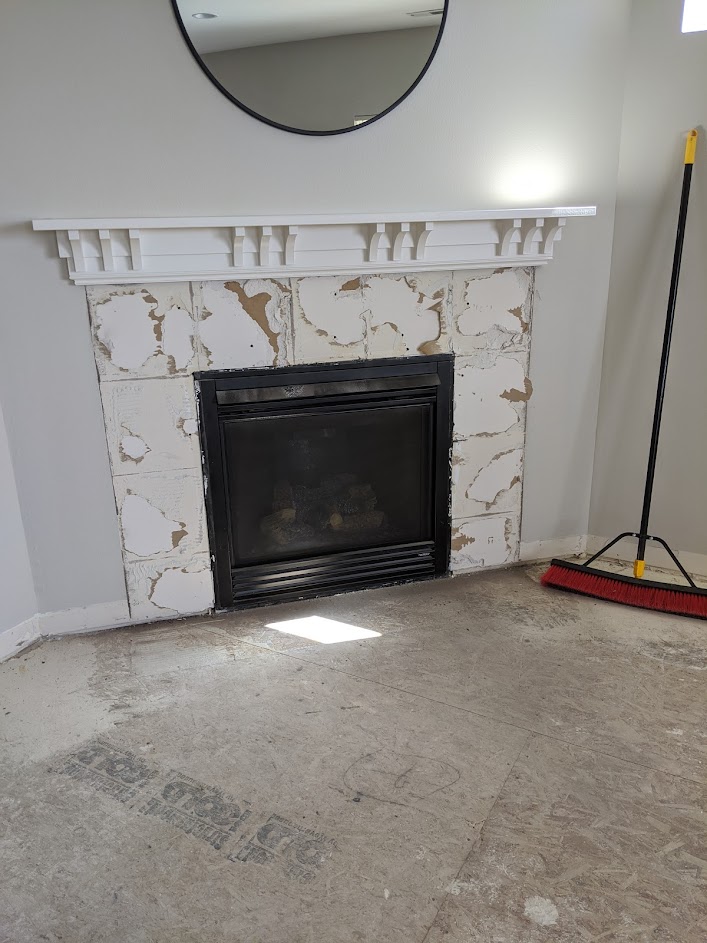
Once we pulled out the hearth and the flooring, I got to work on removing the slate. I wanted to try and limit the amount of damage to the wall behind the tiles, so I used a trim puller multi-tool. The tool allowed me to carefully remove the tiles without taking much drywall with it. I highly recommend a trim puller instead of a crowbar since it does a much cleaner job.
Even with being careful to remove the tiles, we did require some minor drywall patching to smooth things.
The Fireplace Tile
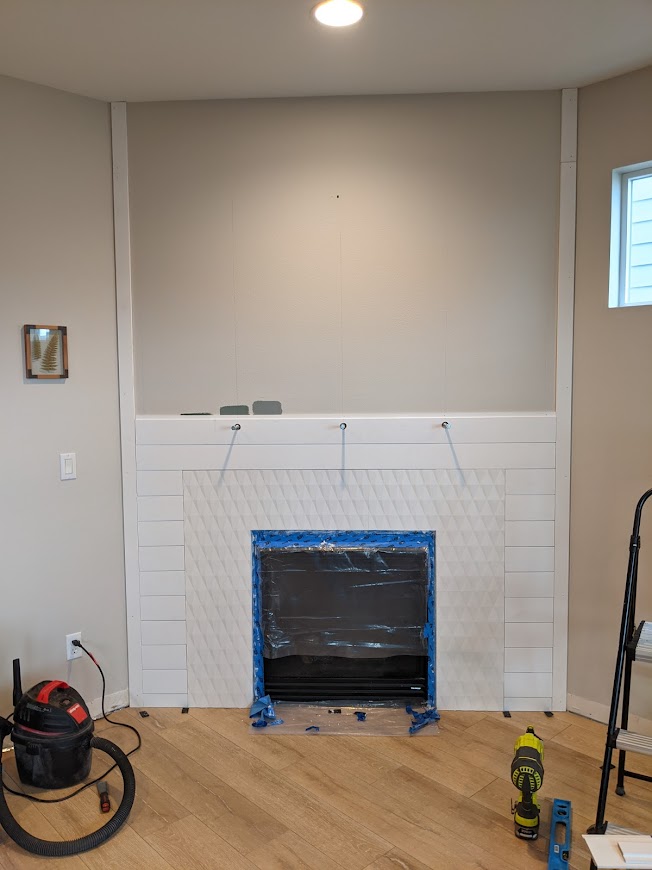
For the tile we knew we wanted something in white with some sort of shape or texture, rather than something like a subway-style. I looked at Floor and Decor, Home Depot, Mission Stone & Tile, Tile Bar, Houzz, and Wayfair. Ultimately, we decided on a porcelain tile with a geometric pattern from Corso Italia Tile, which we were able to pick up at Home Depot. The tile gives the appearance of texture, while still being easy to clean. We also wanted a larger format tile to give a more seamless look.

Picking a Color for the Fireplace
While we were in the process of prepping the fireplace for tile, we decided to paint some sample colors on the wall to narrow down a color for the shiplap. Originally I had considered using a dark gray/black or blue color for the shiplap, and even purchased a quart of Sherwin Williams’ Peppercorn. We have SW Peppercorn on our shutters and front door and I love it, but after trying the color on a small sample of shiplap, I didn’t love it for the fireplace.
After nixing Peppercorn, I went back to Sherwin Williams to pick out paint samples. I came across their Designer Color Collection and instantly fell in love with the colors in their Rustic + Refined palette.


Succulent instantly caught my eye, with Taiga a close second. I went in to Sherwin Williams to pick up a sample quart, but learned that the colors were only sold by the gallon. I was hesitant to commit to a color without first trying it, and especially given that the color collection was new and I couldn’t find sample images online.
Back to the drawing board.
After falling in love with Succulent, I knew I wanted green for the shiplap. I tried to locate a similar color to Succulent in Sherwin Williams’ normal line of paints, and tried a few options.
Pewter Green, while great painted as a sample on the wall, suddenly pulled a very olive/army green color when tested on a piece of shiplap.

When you like a color, you just can’t get that color out of your head. Ultimately, we crossed our fingers, bit the bullet, and bought the Succulent.
Installing the Shiplap
After tiling around the fireplace insert, we got to work on the shiplap. We went back and forth about painting the shiplap first, or painting it once it was installed. We were unfortunately short on garage space since we were simultaneously working on installing the laminate hardwoods, so we decided to paint after.
In hindsight, painting first would have been the better option. Nickel gap boards (which we used) do not offer a lot of space to allow a brush or roller to fully coat the gaps with paint. Unless you are using a sprayer, it’s highly recommended that you paint the shiplap first… unless you really like to go back with a small foam brush and meticulously fill in nickel gaps with more paint. I don’t.
Prior to installing the nickel gap boards, we installed 4″ wide trim pieces along the sides. This was to allow for a cleaner edge where the walls meet at an angle. We also anchored lag bolts to the wall studs for our mantle, and then used a step drill bit to create holes in one of the boards for the lag bolts.
The Fireplace Mantle
Once we installed and painted the shiplap, we worked on installing our mantle. We originally purchased a beam at a local lumber yard to use as our mantle. The length was equal to the span of the fireplace tile. However, once we placed it on the wall, something seemed off. When looking straight on, the beam seemed fine. Once you looked at the wall from an angle, it looked like the beam was off-centered. The angle of the wall was creating an optical illusion. To correct it, we’d need the mantle to span the entire width of the wall.

Fortunately for us, we happened to have a large glulam beam left over from our covered patio project. It was a much larger beam in terms of width and length. We thoroughly sanded down the beam and created notches for where the beam would sit against the side trim.
We originally tried staining the beam with Varathane Summer Oak, but the color pulled too orange.
After testing out 6 different stain colors, we ultimately decided on Minwax Wood Finish in Driftwood.
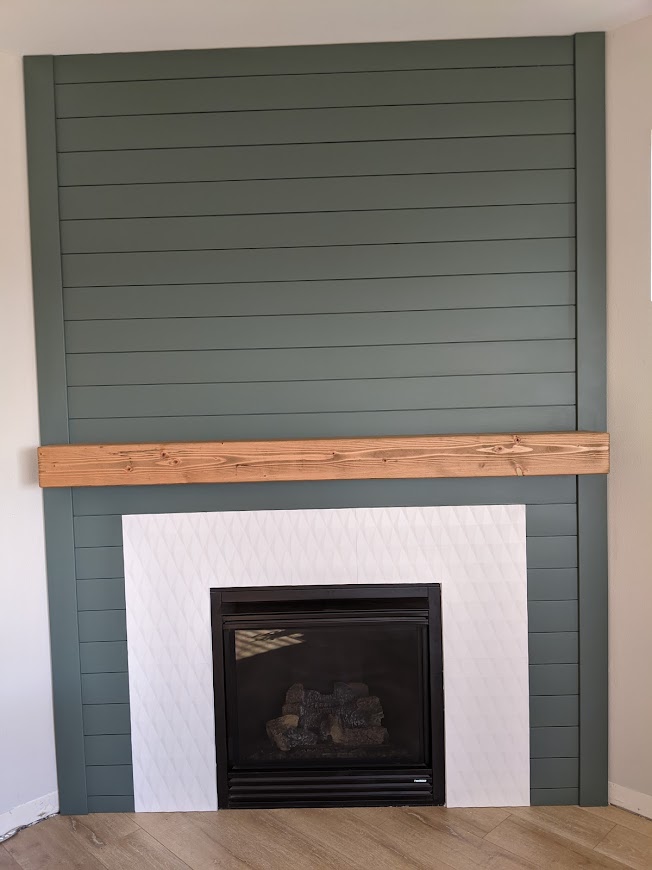
Once we re-stained the beam with the new color, we secured the beam on the lag bolts with Liquid Nails.
The Fireplace- After
What should have ideally been a weekend renovation project ended up turning into 4-5 weekend project. This was primarily because we took our time in making design choices. We also needed to course-correct when things weren’t working out perfectly (painting the nickel gap and finding the right size/color mantle). Overall, we are in love with our new fireplace and think it’s a great focal point of the room now.

Styling
Source Links:


One Comment
Pingback: